
Honeywell TH8000 Installation Manual
Welcome to the comprehensive guide for installing your Honeywell TH8000 thermostat! This manual provides step-by-step instructions, safety precautions, and wiring diagrams to ensure a successful installation. Whether you are a homeowner or a professional, this guide will help you set up your thermostat correctly for optimal performance and energy savings.
The Honeywell VisionPRO TH8000 series represents a leap forward in thermostat technology, combining user-friendly design with advanced functionality. This series is designed to provide precise temperature control and energy efficiency for your home. With its intuitive touchscreen interface, programming your desired comfort settings becomes effortless. The large, clear display shows current and set temperatures, even in low-light conditions.
This installation manual covers the VisionPRO TH8000 series, including models such as the TH8110U and TH8320U. These thermostats are compatible with a variety of heating and cooling systems, including conventional and heat pump systems. Features like 7-day programming schedules maximize comfort and economy, allowing you to tailor your home’s temperature to your lifestyle. Armchair programming enables you to set schedules conveniently off the wall.
The VisionPRO TH8000 series offers a range of benefits, including energy savings, enhanced comfort, and ease of use. By following this manual, you can properly install and configure your thermostat, ensuring it operates efficiently and effectively. Whether you’re looking to upgrade your existing thermostat or installing a new system, the Honeywell VisionPRO TH8000 series is a smart choice for modern home climate control.
Safety Precautions Before Installation
Before you begin the installation of your Honeywell VisionPRO TH8000 thermostat, it is crucial to prioritize safety. Improper installation can lead to electrical shock or equipment damage. Always disconnect power to your heating and cooling system at the circuit breaker or fuse box before starting any work. This will prevent accidental electrical shock and ensure a safe working environment.
This installation should be performed by a trained, qualified technician. If you are not familiar with electrical wiring or HVAC systems, seek professional assistance to avoid potential hazards. Read and understand all instructions in this manual before proceeding with the installation. Ensure you have the necessary tools and materials to complete the installation safely and effectively.
Be aware of the voltage requirements of your heating and cooling system, and ensure that your thermostat is compatible. Incorrect voltage can damage the thermostat and your HVAC equipment. When handling wiring, use appropriate safety gear, such as insulated gloves and eye protection. Double-check all connections to ensure they are secure and properly insulated. Following these safety precautions will help you install your Honeywell VisionPRO TH8000 thermostat safely and efficiently, ensuring years of reliable performance.
Wallplate Installation Guide
To begin the wallplate installation for your Honeywell VisionPRO TH8000 thermostat, first separate the wallplate from the thermostat. Grasp the top and bottom of the wallplate and gently pull it away from the thermostat body. This separation is necessary to mount the wallplate securely to the wall.
Next, position the wallplate on the wall where you intend to install the thermostat. Use a pencil to mark the locations for the mounting screws. If you are mounting on drywall, you may need to use wall anchors to ensure a secure hold. Drill holes at the marked locations and insert the anchors if necessary.
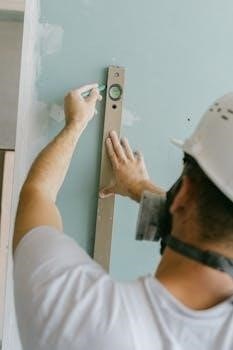
Pull the wires from your heating and cooling system through the opening in the wallplate. Align the wallplate with the drilled holes and secure it to the wall using the provided screws. Ensure the wallplate is level for a professional appearance. Once the wallplate is firmly attached, proceed with the wiring connections according to the wiring diagrams in this manual. Proper wallplate installation is crucial for the stability and functionality of your thermostat.
Power Options⁚ Transformer Systems
When installing your Honeywell TH8000 thermostat, understanding the power options for transformer systems is crucial for proper operation. This thermostat supports both single-transformer and two-transformer systems, offering flexibility in different HVAC setups. For single-transformer systems, the thermostat receives power from a single transformer that supplies both the heating and cooling components. In this configuration, ensure that the common wire (C-wire) is connected to provide continuous power to the thermostat.
However, if you have a two-transformer system, one transformer powers the heating system, and the other powers the cooling system. In such cases, it is essential to remove the factory-installed jumper wire between the R and Rc terminals on the thermostat. This separation allows each transformer to power its respective system without interference. Connecting the R wire from the heating transformer and the Rc wire from the cooling transformer ensures that each system receives the correct voltage.
Incorrect wiring in a two-transformer setup can lead to operational issues or damage to the thermostat and HVAC equipment. Always verify your system’s configuration before proceeding with the wiring process.
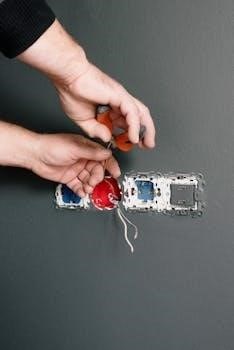
Wiring Instructions⁚ Conventional Systems
When installing your Honeywell TH8000 thermostat with a conventional heating and cooling system, it’s crucial to follow the wiring instructions accurately. These systems typically use separate wires for heating, cooling, and fan control, making precise connections essential for proper operation. Start by identifying the wires coming from your existing thermostat and labeling them according to their corresponding terminals.
For heating, connect the R wire to the R terminal on the TH8000 thermostat. This wire provides the heating power. Then, connect the W wire to the W terminal, which activates the heating system when the thermostat calls for heat. For cooling, connect the Y wire to the Y terminal. This wire signals the air conditioning unit to turn on when cooling is needed.
The G wire controls the fan, and it should be connected to the G terminal on the thermostat. This allows you to manually control the fan or have it run automatically during heating or cooling cycles. Finally, if your system has a common wire (C-wire), connect it to the C terminal. The C-wire provides continuous power to the thermostat, which is essential for many of its advanced features and reliable operation.
Wiring Instructions⁚ Heat Pump Systems
Wiring a Honeywell TH8000 thermostat to a heat pump system requires careful attention to ensure proper functionality. Heat pumps differ from conventional systems as they provide both heating and cooling through a single unit, often utilizing a reversing valve to switch between modes. Proper wiring is essential for the thermostat to correctly control these functions.
Begin by identifying the wires from your existing thermostat. Connect the R wire, which provides power, to the R terminal on the TH8000. For the reversing valve, typically labeled as O or B, connect the appropriate wire to the O/B terminal on the thermostat. Determine whether your system energizes the reversing valve in heating or cooling mode, and set the thermostat accordingly during the setup process.
Connect the Y wire to the Y terminal, which activates the compressor for both heating and cooling. The G wire, which controls the fan, should be connected to the G terminal. If your system uses auxiliary or emergency heat, connect the W wire to the Aux terminal. Finally, a C-wire, if available, should be connected to the C terminal to provide constant power to the thermostat.
Terminal Designations Explained
Understanding the terminal designations on your Honeywell TH8000 thermostat is crucial for correct wiring and optimal performance. Each terminal corresponds to a specific function within your HVAC system, and connecting the wires properly ensures that the thermostat can effectively control your heating and cooling;
The R terminal is typically for the power supply, often connected to the 24VAC hot wire from the transformer. C, or Common, provides a stable power source, ensuring consistent operation of the thermostat. The Y terminal controls the compressor, activating the cooling function in air conditioning systems and the heating function in heat pump systems.
The G terminal is responsible for the fan, allowing you to circulate air even when heating or cooling isn’t needed. For heating systems, the W terminal activates the heating element or furnace. In heat pump systems, O/B controls the reversing valve, determining whether the system provides heating or cooling. The Aux terminal is used for auxiliary or emergency heat, providing supplemental heating when needed.
Removing Tab and Mounting Thermostat

Once the wiring is complete, the next step in installing your Honeywell TH8000 thermostat is removing the protective tab and securely mounting the thermostat to the wallplate. This process ensures that the thermostat functions correctly and remains stable for accurate temperature sensing.
Carefully remove the protective tab. This tab prevents the battery from draining during storage and shipping. Gently pull the tab straight out to activate the thermostat. With the tab removed, the display should light up, indicating that the thermostat is powered on and ready for programming.
To mount the thermostat, align it with the wallplate that you previously installed. Ensure that the pins on the back of the thermostat line up with the corresponding slots on the wallplate. Gently push the thermostat onto the wallplate until it clicks into place. This secure connection ensures that the thermostat is properly seated and will not easily detach.
Double-check that the thermostat is firmly attached to the wallplate. A loose connection can cause inaccurate temperature readings and operational issues. If the thermostat does not seem secure, re-align it and try again, ensuring a snug fit.
Setting Date and Time on the Thermostat
After successfully mounting the thermostat, setting the correct date and time is crucial for accurate scheduling and programming. The Honeywell TH8000 relies on this information to execute programmed settings effectively. Here’s how to set it up⁚
Begin by pressing the “Menu” button on the thermostat’s touchscreen. Navigate through the menu options until you find “Date/Time.” Select this option to enter the date and time setting mode.
Use the up and down arrow buttons to adjust the month, day, and year. Ensure that you select the correct values to match the current date. Once the date is set, proceed to set the time.

Adjust the hour and minute using the same arrow buttons. Pay attention to the AM/PM setting to ensure the time is accurately reflected. Some models may offer a 24-hour clock option, which can be selected in the settings menu if preferred.
After setting both the date and time, select “Done” or “Save” to confirm your changes. The thermostat will then display the current date and time on the main screen. Verifying the displayed information is correct is a good practice to ensure no errors were made during the setting process. Accurate date and time settings are essential for the thermostat to follow programmed schedules and maintain optimal comfort in your home.
Programming the Thermostat
Programming your Honeywell TH8000 thermostat allows you to customize temperature settings based on your daily schedule, optimizing comfort and energy efficiency. The TH8000 series typically offers both 7-day programmable and non-programmable options, catering to varied user needs.
To begin programming, access the main menu by pressing the “Menu” button. Look for the “Schedule” or “Program” option and select it. Most models offer pre-set programs, which you can customize or override.
The thermostat usually allows you to set different temperature settings for various periods of the day, such as “Wake,” “Leave,” “Return,” and “Sleep.” Select the period you want to program first, then adjust the temperature settings using the up and down arrow buttons.
Repeat this process for each period and each day of the week. Some models allow you to copy settings from one day to another to save time. Ensure you save your settings after making changes.
Consider your daily routine when setting the temperature for each period. Lowering the temperature while you’re away and at night can significantly reduce energy consumption. The Honeywell TH8000’s intuitive interface makes it easy to set and adjust your program, ensuring optimal comfort and cost savings. Regularly reviewing and adjusting your program based on changing needs can further enhance its effectiveness.
Troubleshooting Common Installation Issues
Even with careful installation, some issues may arise with your Honeywell TH8000 thermostat. A common problem is the thermostat not powering on. Ensure the power supply is connected correctly, and the breaker is not tripped. Check the wiring connections for any looseness or incorrect placements based on the wiring diagrams.
Another issue is inaccurate temperature readings. Ensure the thermostat is not exposed to direct sunlight or drafts, which can affect its sensor. Recalibrate the thermostat if necessary, following the calibration procedure in the manual.
If the heating or cooling system doesn’t respond to the thermostat, verify the wiring between the thermostat and the HVAC equipment. Incorrect wiring is a frequent cause of such problems. Confirm that the thermostat is set to the correct system mode (heat, cool, or auto).
If the display shows error codes, consult the manual for specific troubleshooting steps related to those codes. Often, these codes indicate specific problems with the wiring or system configuration.
For wireless models, check the wireless connection and ensure the thermostat is within range of the receiver. Interference from other devices can disrupt the connection. If issues persist, contacting a qualified HVAC technician can help diagnose and resolve more complex problems, ensuring your Honeywell TH8000 operates correctly.
No Responses